Do you want to connect your Rollo printer to your computer? If yes, this is the right place for you. I know the struggle of connecting a printer for the first time. I have had many people who felt a little strange while setting up their printers. That’s why I am here to assist you and teach you ‘how to connect Rollo printer to computer‘.
Printers are extremely important, and their setup should be done with caution to avoid issues. Well, I’m not exaggerating the process, but yes, I’m just trying to make you a little serious while connecting your devices together.
There are different ways how to connect your Rollo printer to a computer such as with wire and wireless connections. Without wasting a second, let’s move on to the steps.
How to Connect Rollo Printer to Wi-Fi With LED Button?
You must know ‘how to connect your Rollo printer to Wi-Fi‘ to avoid hassle. You should have a broadband connection to connect both of your devices to that. Also, the router should be close to your printer. Once you’ve all done, go with the steps given below.
- Go to your printer panel and press the Wi-Fi LED button for about 15 seconds.
- Then, stop when you see the yellow light on your printer.
- After that, search for the available Wi-Fi networks on your computer.
- Now, select the Connect button once you find the printer’s name.
- In the next step, you’ll see a message on the screen.
- Also, choose the option to use a security key.
- Here, type “Rollo printer” as a password.
- Moving forward, you’ll see a Rollo printer portal page.
- On the following screen, supply your password for the internet network.
- Next, use the same password to connect the printer.
- Then, check the LED light. When the blue light flashes, it means your connection is successful.
Finally, you know how to connect a printer to Wi-Fi using an LED button. You can now connect your printer to a computer.
How to Connect Rollo Printer to Computer: 2 Methods Ways
In this section, you’ll understand how to connect a printer to your computer, whether Windows or Mac.
Method 1: Connect Rollo Printer to Computer With USB
The wired connection is the primary connection between your devices. To set up this connection, you must insert the USB cable into the USB interfaces of your computer and the computer. Most importantly, you must install the USB drivers on your computer to complete the connection. Finally, you know how to connect Rollo printer to computer using USB. Let’s move on to the other methods.
Method 2: Connect Rollo Printer to Computer via Wi-Fi
After the wired connection, you must know the wireless connection, such as the Wi-Fi connection. This process involves a few steps that you need to follow.
For Windows
If you are a Windows user, you must follow the steps given below to connect your printer to the computer.
- In the beginning, navigate to Rollo’s official website.
- Then, download printer drivers.
- After that, visit the Downloads folder where your drivers are downloaded by default.
- Next, double-click on the driver’s file to extract it and then open it.
- When the installation is complete, you’ll see a Finish option.

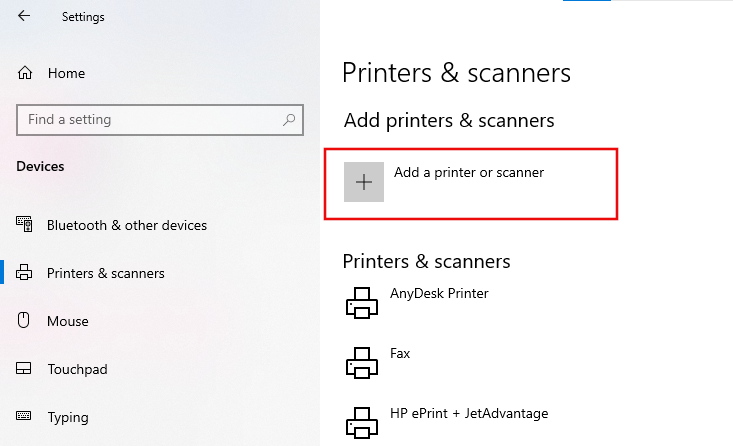
- In the following step, go to the Control Panel on your Windows computer.
- Also, check the Devices and Printers section.
- Now, select the “Add a printer or scanner” option and choose the printer from the on-screen list of printers.
- After you add the printer, right-click on the printer and select “Printing Preferences.”
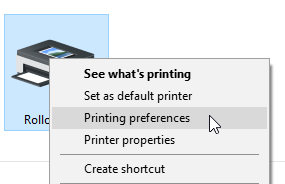
- Then, hit the Advanced option on the Printing Preferences’s right-hand side.
- Finally, choose your preferred size of paper and hit OK.
This is how to connect Rollo printer to computer via Wi-Fi. Make sure that both of your devices are on the same wireless network.
For Mac
If you’re a Mac user and want to connect your printer to a Mac, use the steps given below:
- Start the process by downloading and installing printer drivers.
- To download them, visit the official website of Rollo printers.
- After that, move on to the Downloads section, where your file will probably be saved.
- Now, find the printer drivers file and double-click on it to extract and install it.
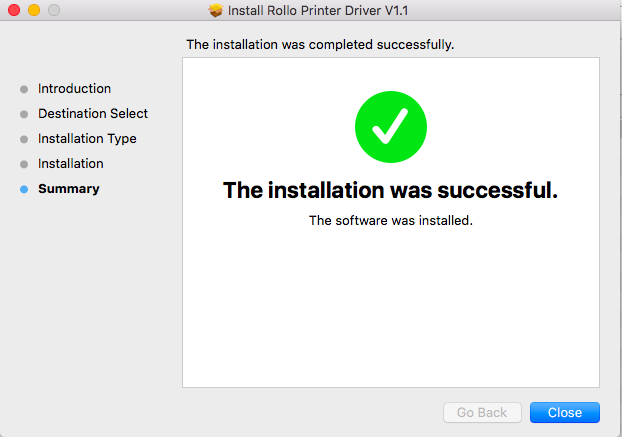
- Then, go with the on-screen steps to continue.
- Next, go to your Mac and open the System Preferences.
- In the following step, open the Printers and Scanners option.
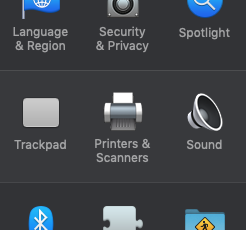
- Also, you’ll see a plus sign at the lower left side of the screen.

- Here, choose the Add printer or scanner option.
- Now, your printer will be seen as a “Printer Thermal Printer.”
- Select your printer and choose the “Select Software” option from the drop-down menu.
- Lastly, choose the “Rollo Printer” and hit OK.
That’s how you can connect your printer to your computer. Now, you’re ready to take prints.
Frequently Asked Questions (FAQs)
Why Is My Computer Unable to Find My Rollo Printer?
It may happen because of many reasons. If that happens, switch off your printer and disconnect it from your computer. Now, download your drivers and install them. When you install them successfully, go to the Control Panel and open the Devices and Printers option. Again, connect your printer to the computer and switch it ON.
Can I Use a Rollo Printer Without Wi-Fi?
Yes, you can use a printer without Wi-Fi. All you need is a USB cable to setup a wired connection. However, you should know which operating systems are compatible with your printer. Whether you have a Windows or a Mac computer, you can use a USB connection.
How to Connect Rollo Printer to Computer?
Learn ‘how to connect your printer to a Windows 10 computer‘, follow these steps:
- Get printer drivers from Rollo’s official website.
- Then, download them and install them on your computer.
- Now, go to the Control Panel on your computer.
- After that, go to the Devices and Printers option.
- Next, hit the “Add a printer” option and choose your printer from the list.